Serverless computing is the need of the hour, and Microsoft Azure Functions is a serverless architecture delivering event-driven cloud computing and suitable for application development. Through Azure Functions, you can author and execute snippets of code in the cloud without the hassle of managing the web servers or containers. Hence, we say it has serverless architecture. It lets you run small pieces of code and the developer doesn’t have to worry about the infrastructure of the platform on which it is executed. This way, Function-as-a-Service becomes a generic term for serverless and eliminates infrastructure considerations for the developer. Of course, servers are there, but the user doesn’t have to bother with managing them. They can even be scaled according to demand. To build the apps themselves, the developers can use their own choice of programming language, giving them the freedom to work optimally.
Systems are built to react to a series of events. Whether it’s a web API, database changes, IoT data streams. Application needs a way to run some code as these events occur. To meet this need, Azure Functions provides “compute on-demand” in two significant ways. First, Azure Functions allows you to implement your system’s logic into readily available blocks of code. These code blocks are called “functions”. Different functions can run anytime you need to respond to some events. Second, as requests increase, Azure Functions meets the demand with as many resources and function instances as necessary.
Common scenarios where Azure functions are used are-
- Implement an endpoint for your web applications using the HTTP trigger
- Run code when a file is uploaded or changed
- Chain a series of functions together
- Run custom logic when a database is updated.
- Execute code at set times (Eg. every hour, every week, etc)
There are many options available of using Azure function apps-
- There is no language restriction. Developer can write function in Write functions in C#, Java, JavaScript, PowerShell, or Python, or use a custom handler to use virtually any other language.
- Deployments can be automated and many options are available. You can check that out here. In this tutorial we will push the code using Visual Studio.
- Troubleshoot a function: Use monitoring tools and testing strategies to gain insights into your apps.
- Flexible pricing option. Check out the plans here
To develop and create functions, you need to have an active Azure subscription and an Azure Storage account.
Let us create a function in Azure that is triggered by a timer:
- From the Azure portal menu or the Home page, select Create a resource.
- In the New page, search for Function App and click create.

- On the next page you will see the basics tab-
- Select your subscription from the drop down
- Select a resource group or create a new one.
- Give a name to function app in the Function app name field
- In publish select Code.
- Choose a runtime that supports your function programming language. In our case it is Python
- Choose Python Version.
- Choose a region near you or near other services your functions access. Then proceed to hosting

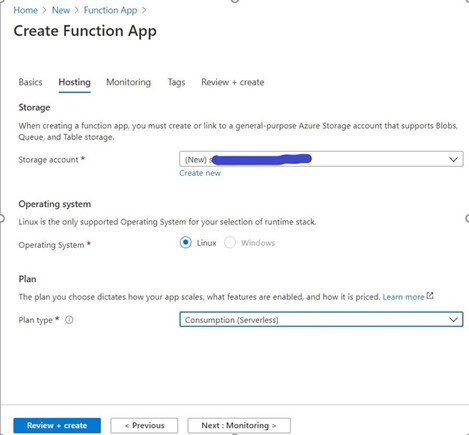
- Under the Hosting tab select the following-
- Select a storage account if you have created it earlier for any other task. Or else create a new one
- Select the runtime stack. For Python the default runtime stack is Linux
- Choose the Plan type depending upon your scaling requirements, features and budget. (Hosting plan that defines how resources are allocated to your function app. In the default Consumption plan, resources are added dynamically as required by your functions. In this serverless hosting, you pay only for the time your functions run. When you run in an App Service plan, you must manage the scaling of your function app.)
- Select Next and this will lead you to Monitoring tab. Enable Application Insights and create a new Application Insight resource. This is optional but recommended to monitor the functioning of your App. Depending upon your subscription plan this option may or may not be available.
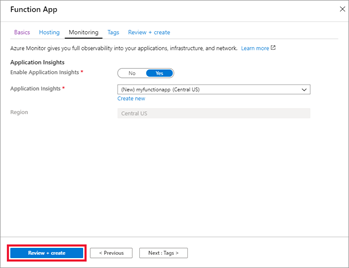
- Select Review + create to review the app configuration selections and then select Create to provision and deploy the function app.
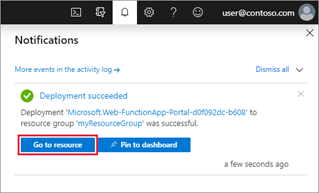
- Go to home screen or click on notification icon to go to the newly created function app.
Now in the next step we will use Visual Studio to deploy our code to function app. The code that I will be deploying is for fetching daily paypal transactions and pushing it into a database. Details of the code logic and the code you can find in a separate blog in this link.
Pre-requisites for the below steps are-
- An Azure account with an active subscription.
- Visual Code Studio
- The Python extension for Visual Studio Code.
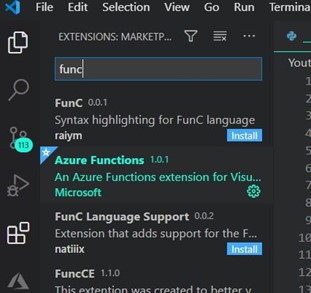
- The Azure Functions extension for Visual Studio Code.
Steps-
- First open Visual studio and sign in with an account having Azure Subscription.
- Now for ease of use install the Azure functions extension from extensions menu on the left.
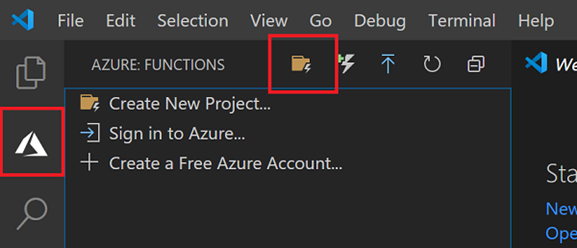
- Choose the Azure icon in the Activity bar, then in the Azure: Functions area, select the Create new project icon.
- Choose a directory location for your project workspace and choose Select.
- Provide the following information at the prompts:
- Select a language for your function project: Choose Python.
- Select your preferred location the location
- Select a trigger for your project’s function: Choose Timer trigger.
- Provide a function name.
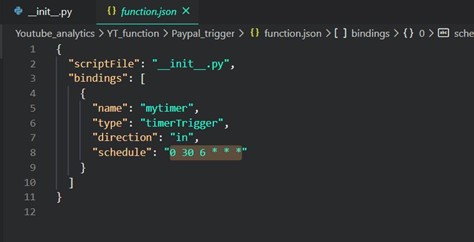
- Provide a NCRONTAB expression which tells Azure How frequently and when do you want the function to run. You can check out how to write this expression here. In this example we put this – “0 30 6 * * *” which indicates that my code will run everyday at 6 30 am in UTC time zone. You can later change this expression from Visual Code Studio by doing the following-
i)Go to files tab on the left part of your Visual studio and find the location where you created this project.
- ii) Find the function.json file here and in that change the value of schedule to your desired CRON expression.
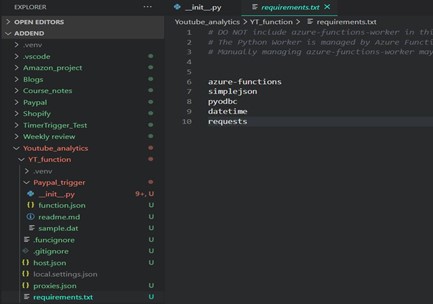
- Add the names of all the libraries that is needed to run the code under requirements.txt file that is located in the project folder.
- Using this information, Visual Studio Code generates an Azure Functions project with a timer trigger.
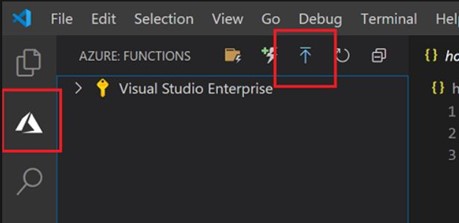
- Now publish the Function to Azure. In this step you can either create a new Function App while deploying through Visual Studio or select the app that you already created using Azure Portal. We have already created function app in the previous step so we will go with the later option. (Creating Function App via Visual Studio involves the same steps as we did earlier using Azure portal.)
- Now the deployment starts and you can see it in the output tab.
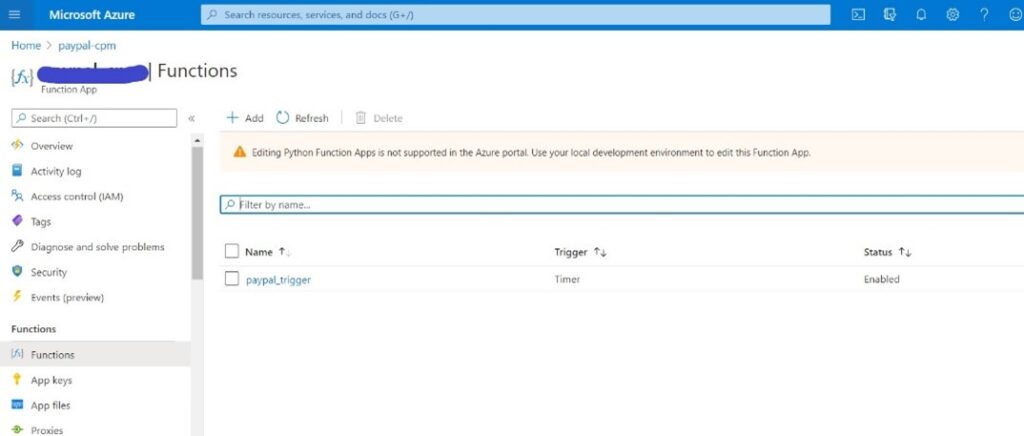
After completing this open Azure portal and find the function app that you had created and open it.
On the left-hand side menus look for functions menu tab and under that select function button. You will see a new item there which has the name of the trigger that you created earlier.
Click on the function and then click on Code + Test on the left-hand side menu. You can see the code that you had pushed via Visual Studio.
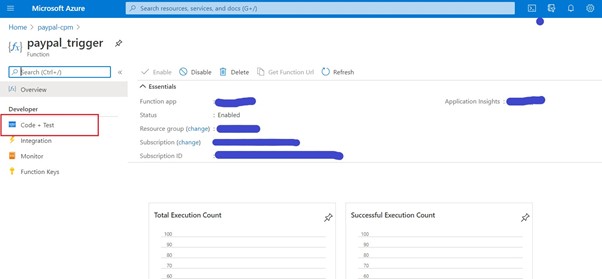
Now this code will run everyday at 6 30am. And you do not have to look at this task again as long as it is executing successfully. When a failure occurs, you can see what error occurred in the ‘Monitor’ menu which can be seen in the above picture. In order to set up timely monitoring of the Azure function you need to configure it if you have not done it while creating the Function App. Anyway, in monitor menu you can view the success and failure count of the function. You can also set up an alert where you will receive an email or SMS when a failure occurs. We will see that in another blog.
Mahadevan Iyer,
Data Engineer at Addend Analytics.